The figure above shows, we can draw a simple heart shape with 4 segments: 2 lines and 2 arcs. We can continuously draw these 4 segments without lifting up the pen.
We start from the bottom tip of the heart. The heading for the blue line is 45 degrees. The second segment is 225 degree arc. After initial 45 degree heading and 225 degree turn, the heading of the turtle will be a 45+225=270 degrees, which is facing down perfectly. The rest of the two segments are symmetric to the first two. All we need to do is just turn the Turtle by 180 degrees before drawing the 3rd segment.
The next step is to figure out the ratio of blue segment and the radius of the arc. In the figure above, a triangle formed by two black lines and the blue line is a right triangle. The angle between two black lines is (360-225)/2 = 67.5 degrees, where 225 is the degree of the arc. Therefore, the ratio of blue line segment and the radius equals to tangent(67.5).
Here is the code:
import turtle
import math

turtle.color('red')
d = 800
r = d/math.tan(math.radians(67.5))
turtle.up()
turtle.goto(0,-600)
turtle.seth(45)
turtle.down()
turtle.fd(d)
turtle.circle(r,225)
turtle.left(180)
turtle.circle(r,225)
turtle.fd(d)
You can easily draw a filled heart by calling begin_fill() and end_fill() functions:
turtle.color('red')
d = 800
r = d/math.tan(math.radians(67.5))
turtle.up()
turtle.goto(0,-600)
turtle.seth(45)
turtle.begin_fill()
turtle.down()
turtle.fd(d)
turtle.circle(r,225)
turtle.left(180)
turtle.circle(r,225)
turtle.fd(d)
turtle.end_fill()
Draw the following overlapping circles. Please note that each circle passes through the center of the other two circles.
Three Overlapping Circles
Solution
We observe that the centers of the three circles form an equilateral triangle and the length of the equilateral triangle is the radius of the circle. So, the first step is to figure out the coordinates of the vertices of the equilateral triangle (with some math), and then draw three circles given the these three coordinates as the centers. So, it will be helpful to create a function that draws circle based on the center and radius. The following is the source code:
Use recursion to draw the following snowflake shape generated from 6 sub-fractals of splitting lines.
Recursion Depth 5
The following figures show recursion depths ranging from 0 to 4.
Solution:
To solve this problem, you want to start from a function that draws a line given starting point (x,y), length, direction, and pensize. The following is the code for this function:
Now you can define the recursive function that keeps branching out the shorter pair of lines. The starting point of the branch is about 2/5 of way from the original starting point. One branch is turning right about 25 degrees and the other branch is turning left about 25 degrees. Pen size should decrease proportionally too. The following is the code for this function:
The last function is the easiest. Just call the function above 6 times with 6 evenly spaced lines across 360 degrees. The following is the complete code for this project:
import turtle
import math
screen = turtle.Screen()
screen.title('6 Line Snowflake Fractal - PythonTurtle.Academy')
screen.setup(1000,1000)
screen.tracer(0,0)
turtle.hideturtle()
turtle.speed(0)
def line(x,y,length,direction,pensize):
  turtle.up()
  turtle.pensize(pensize)
  turtle.goto(x,y)
  turtle.down()
  turtle.seth(direction)
  turtle.fd(length)
def line_fractal(x,y,length,direction,pensize,n):
  if n==0: return
  line(x,y,length,direction,pensize)
  line_fractal(x+math.cos(direction*math.pi/180)*length*2/5,
               y+math.sin(direction*math.pi/180)*length*2/5,
               length*3/5,
               direction-25,
               pensize*3/5,
               n-1)
  line_fractal(x+math.cos(direction*math.pi/180)*length*2/5,
               y+math.sin(direction*math.pi/180)*length*2/5,
               length*3/5,
               direction+25,
               pensize*3/5,
               n-1)
def snowflake():
for i in range(6):
line_fractal(0,0,400,i*60,5,5)
snowflake()
screen.update()
It is very helpful to make a function that draws star at any given center and size. The following code is the function that does the work. It also can draw filled stars given pen color and fill color.
def star(x,y,length,penc,fillc):
  turtle.up()
  turtle.goto(x,y)
  turtle.seth(90)
  turtle.fd(length)
  turtle.seth(180+36/2)
  L = length*math.sin(36*math.pi/180)/math.sin(54*math.pi/180)
  turtle.seth(180+72)
  turtle.down()
  turtle.fillcolor(fillc)
  turtle.pencolor(penc)
  turtle.begin_fill()
  for _ in range(5):
    turtle.fd(L)
    turtle.right(72)
    turtle.fd(L)
    turtle.left(144)
  turtle.end_fill()
The next step is to define a recursive function that draws the star fractal. One way to stop the recursion function is to set the depth limit. In each recursive call decrement the depth limit by 1. The base condition of the recursive call is when the depth limit is 0. In this case, just draw a star by calling the function we defined above. It requires some trigonometry to figure out the centers and the size of 5 star fractals relative to the current center and size. The following code is the recursive function:
def star_fractal(x,y,length,penc,fillc,n):
  if n==0:
    star(x,y,length,penc,fillc)
    return
  length2 = length/(1+(math.sin(18*math.pi/180)+1)/math.sin(54*math.pi/180))
  L = length-length2-length2*math.sin(18*math.pi/180)/math.sin(54*math.pi/180)
  for i in range(5):
    star_fractal(x+math.cos((90+i*72)*math.pi/180)*(length-length2),
                 y+math.sin((90+i*72)*math.pi/180)*(length-length2),
                 length2,penc,fillc,n-1)
The following is the complete code:
import turtle
import math

screen = turtle.Screen()
screen.title('Star Fractal - PythonTurtle.Academy')
screen.setup(1000,1000)
screen.tracer(0,0)
turtle.hideturtle()
turtle.speed(0)

def star(x,y,length,penc,fillc):
  turtle.up()
  turtle.goto(x,y)
  turtle.seth(90)
  turtle.fd(length)
  turtle.seth(180+36/2)
  L = length*math.sin(36*math.pi/180)/math.sin(54*math.pi/180)
  turtle.seth(180+72)
  turtle.down()
  turtle.fillcolor(fillc)
  turtle.pencolor(penc)
  turtle.begin_fill()
  for _ in range(5):
    turtle.fd(L)
    turtle.right(72)
    turtle.fd(L)
    turtle.left(144)
  turtle.end_fill()

def star_fractal(x,y,length,penc,fillc,n):
  if n==0:
    star(x,y,length,penc,fillc)
    return
  length2 = length/(1+(math.sin(18*math.pi/180)+1)/math.sin(54*math.pi/180))
  L = length-length2-length2*math.sin(18*math.pi/180)/math.sin(54*math.pi/180)
  for i in range(5):
    star_fractal(x+math.cos((90+i*72)*math.pi/180)*(length-length2),
                 y+math.sin((90+i*72)*math.pi/180)*(length-length2),
                 length2,penc,fillc,n-1)

star_fractal(0,0,400,'blue','blue',3)
screen.update()
In this tutorial we are going show you how to draw a basic football shape with Python’s Turtle graphics library. As seen in the next figure, football shape has two sections: red section and blue section. We are going to draw each section one by one.
Two sections of football shape
To draw the red section, we need to lift up the pen and goto the red dot and use Turtle’s circle function to draw an arc. The degree of the arc can vary, but 90 degree works good. Turtle’s pen will turn 90 degrees counter-clock wise after drawing this arc. If we set the initial heading of the pen to -45 degrees, the heading of the pen will end up to be 45 degrees after drawing the 90 degree arc – a perfect symmetry! The following is the code snippet for drawing the red arc:
r = 500
turtle.up()
turtle.goto(-r/2**0.5,0)
turtle.seth(-45)
turtle.down()
turtle.color('red')
turtle.circle(r,90)
Red Arc
The blue arc can be drawn in the similar way. The first step is to set the heading of Turtle’s pen to 135 (135 = 90 + 45) degree first and draw the 90 degree arc with circle function. The following is the code snippet:
In a previous tutorial we explained how to round a rectangle with Python Turtle. In this tutorial, we are going to show you how to make any corner round. Knowledge in trigonometry will be very helpful understanding this tutorial.
We will try to round a 40 degree corner as shown in the following figure:
The first step is to decide where the rounding starts and where it ends. The closer the starting point to the corner, the smaller the rounded corner will become. Let’s choose distance 100 for this example and mark the starting and end points with red dots and the corner in green dot. The following is the code snippet for drawing to dots:
Because the angle of the corner is 40 degrees, we need to turn left 140 (180 – 40) degrees to draw the second line. Therefore, the arc we draw should also have 140 degrees of extent. The question is: What is the radius of the arc? The following figure will help us figure it out:
The distance between the blue dot and a red dot is the radius of the arc. The red, green, and blue dots form a right triangle. Since we know the distance between red dot to green dot (100), and the angle (20 degrees: half of 40 degrees) of the green dot, we can apply trigonometry to figure out the distance between the blue dot to a red dot: 100*math.tan(math.radians(20)). The following is the complete code for drawing a rounded corner:
It should draw the following shape. The blue dots were drawn to show the starting and end points. They will be removed later.
We are going to draw the round corners with 90 degree arc of a circle in red color. The radius of the arc can be any number. Smaller radius generates smaller round corners. The following is the code snippet for drawing the round corner:
To finish the whole round rectangle, we just need to repeat the process one more time. The following is the complete code snippet with dots and colors removed:
turtle.up()
turtle.goto(-200,-150)
turtle.down()
for _ in range(2):
    turtle.fd(400)
    turtle.circle(100,90)
    turtle.fd(200)
    turtle.circle(100,90)
You may want to generalize this by creating a function that draws round rectangles with any corner size. The following is the complete code:
This step should be straightforward. We just need n horizontal and n vertical lines centered in the screen. The following is the code snippet that draws the grid.
screen=turtle.Screen()
turtle.setup(1000,1000)
turtle.title("Conway's Game of Life - PythonTurtle.Academy")
turtle.hideturtle()
turtle.speed(0)
turtle.tracer(0,0)

n = 50 # nxn grid
def draw_line(x1,y1,x2,y2): # this function draw a line between x1,y1 and x2,y2
    turtle.up()
    turtle.goto(x1,y1)
    turtle.down()
    turtle.goto(x2,y2)

def draw_grid(): # this function draws nxn grid
    turtle.pencolor('gray')
    turtle.pensize(3)
    x = -400
    for i in range(n+1):
        draw_line(x,-400,x,400)
        x += 800/n
    y = -400
    for i in range(n+1):
        draw_line(-400,y,400,y)
        y += 800/n

draw_grid()
screen.update()
It should a grid like the following picture:
n x n grid
Step 2: Creating Life
We need data structure to store the lives in the n x n cells. The natural data structure for this purpose is a list of lists. We are going to use value 1 to represent ‘life’ and 0 to represent ‘no life’. The lives in cells will be randomly generated with 1/7 probability of having life. The following is the code snippet that creates and initializes lives:
life = list() # create an empty list
def init_lives():
    for i in range(n):
        liferow = [] # a row of lives
        for j in range(n):
            if random.randint(0,7) == 0: # 1/7 probability of life
                liferow.append(1) # 1 means life
            else:
                liferow.append(0) # 0 means no life
        life.append(liferow) # add a row to the life list -> life is a list of list
Step 3: Displaying Life in Cells
The next task is to draw live cells in the grid. We will create and use a new turtle called lifeturtle to draw the live cells. Because cells can become alive or dead, we need to erase them and redraw in each cycle. However, there is no need to erase the grid. By just clearing the lifeturtle, there is no need to redraw the grid. The following is complete code for the first 3 steps.
import turtle
import random

screen=turtle.Screen()
turtle.setup(1000,1000)
turtle.title("Conway's Game of Life - PythonTurtle.Academy")
turtle.hideturtle()
turtle.speed(0)
turtle.tracer(0,0)

lifeturtle = turtle.Turtle() # turtle for drawing life
lifeturtle.up()
lifeturtle.hideturtle()
lifeturtle.speed(0)
lifeturtle.color('black')

n = 50 # nxn grid
def draw_line(x1,y1,x2,y2): # this function draw a line between x1,y1 and x2,y2
    turtle.up()
    turtle.goto(x1,y1)
    turtle.down()
    turtle.goto(x2,y2)

def draw_grid(): # this function draws nxn grid
    turtle.pencolor('gray')
    turtle.pensize(3)
    x = -400
    for i in range(n+1):
        draw_line(x,-400,x,400)
        x += 800/n
    y = -400
    for i in range(n+1):
        draw_line(-400,y,400,y)
        y += 800/n

life = list() # create an empty list
def init_lives():
    for i in range(n):
        liferow = [] # a row of lives
        for j in range(n):
            if random.randint(0,7) == 0: # 1/7 probability of life
                liferow.append(1) # 1 means life
            else:
                liferow.append(0) # 0 means no life
        life.append(liferow) # add a row to the life list -> life is a list of list

def draw_square(x,y,size): # draws a filled square
    lifeturtle.up()
    lifeturtle.goto(x,y)
    lifeturtle.down()
    lifeturtle.seth(0)
    lifeturtle.begin_fill()
    for i in range(4):
        lifeturtle.fd(size)
        lifeturtle.left(90)
    lifeturtle.end_fill()

def draw_life(x,y): # draws life in (x,y)
    lx = 800/n*x - 400 # converts x,y to screen coordinate
    ly = 800/n*y - 400
    draw_square(lx+1,ly+1,800/n-2)

def draw_all_life(): # draws all life
    global life
    for i in range(n):
        for j in range(n):
            if life[i][j] == 1: draw_life(i,j) # draw live cells

draw_grid()
init_lives()
draw_all_life()
screen.update()
It should draw a shape like the following image:
Step 4: Updating Life Forever
The next step is to update the life based on the Conway’s Rule:
If a cell with fewer than two or more than three live neighbors dies because of underpopulation or overpopulation.
If a live cell has two or three live neighbors, the cell survives to the next generation.
If a dead cell has exactly three live neighbors, it becomes alive.
We will create a function update_life() that will update the cells based on these rules. Then we will call this function again with the Turtle’s timer event. The following is the complete code for animating the Conway’s Game of Life:
import turtle
import random
import copy

screen=turtle.Screen()
turtle.setup(1000,1000)
turtle.title("Conway's Game of Life - PythonTurtle.Academy")
turtle.hideturtle()
turtle.speed(0)
turtle.tracer(0,0)

lifeturtle = turtle.Turtle() # turtle for drawing life
lifeturtle.up()
lifeturtle.hideturtle()
lifeturtle.speed(0)
lifeturtle.color('black')

n = 50 # nxn grid
def draw_line(x1,y1,x2,y2): # this function draw a line between x1,y1 and x2,y2
    turtle.up()
    turtle.goto(x1,y1)
    turtle.down()
    turtle.goto(x2,y2)

def draw_grid(): # this function draws nxn grid
    turtle.pencolor('gray')
    turtle.pensize(3)
    x = -400
    for i in range(n+1):
        draw_line(x,-400,x,400)
        x += 800/n
    y = -400
    for i in range(n+1):
        draw_line(-400,y,400,y)
        y += 800/n

life = list() # create an empty list
def init_lives():
    for i in range(n):
        liferow = [] # a row of lives
        for j in range(n):
            if random.randint(0,7) == 0: # 1/7 probability of life
                liferow.append(1) # 1 means life
            else:
                liferow.append(0) # 0 means no life
        life.append(liferow) # add a row to the life list -> life is a list of list

def draw_square(x,y,size): # draws a filled square
    lifeturtle.up()
    lifeturtle.goto(x,y)
    lifeturtle.down()
    lifeturtle.seth(0)
    lifeturtle.begin_fill()
    for i in range(4):
        lifeturtle.fd(size)
        lifeturtle.left(90)
    lifeturtle.end_fill()

def draw_life(x,y): # draws life in (x,y)
    lx = 800/n*x - 400 # converts x,y to screen coordinate
    ly = 800/n*y - 400
    draw_square(lx+1,ly+1,800/n-2)

def draw_all_life(): # draws all life
    global life
    for i in range(n):
        for j in range(n):
            if life[i][j] == 1: draw_life(i,j) # draw live cells

def num_neighbors(x,y): # computes the number of life neighbours for cell[x,y]
    sum = 0
    for i in range(max(x-1,0),min(x+1,n-1)+1):
        for j in range(max(y-1,0),min(y+1,n-1)+1):
            sum += life[i][j]
    return sum - life[x][y]

def update_life(): # update life for each cycle
    global life
    newlife = copy.deepcopy(life) # make a copy of life
    for i in range(n):
        for j in range(n):
            k = num_neighbors(i,j)
            if k < 2 or k > 3:
                newlife[i][j] = 0
            elif k == 3:
                newlife[i][j] = 1
    life = copy.deepcopy(newlife) # copy back to life
    lifeturtle.clear() # clears life in previous cycle
    draw_all_life()
    screen.update()
    screen.ontimer(update_life,200) # update life every 0.2 second

draw_grid()
init_lives()
update_life()
In this tutorial we are going to show how to draw random islands with Python Turtle. The idea is similar to the Koch Snowflake project with added randomness. Instead of sub-dividing a line into 4 equal segments of 1/3 of the original length, we will simplify it by dividing a line into two segments with the sum slightly larger than the original line.
The following is the code snippet that recursively subdivides a line segment into two segments each has length: 0.53*(original length). So, each subdivision will increase the length by 6%.
def draw_line(x1,y1,x2,y2): # function to draw line
    turtle.up()
    turtle.goto(x1,y1)
    turtle.down()
    turtle.goto(x2,y2)

def dist(p1,p2): # Euclidean distance betwen p1 and p2
    return ((p1[0]-p2[0])**2 + (p1[1]-p2[1])**2)**0.5

def shoreline(x1,y1,x2,y2,ratio): # recurisve function to draw the shoreline
    L = dist((x1,y1),(x2,y2))
    if L <= 1: # distance is short enough, directly draw the line
        draw_line(x1,y1,x2,y2)
        return
    alpha = math.acos(1/(2*ratio)) # The angle to turn for subdivided segments
    beta = math.atan2(y2-y1,x2-x1) # The angle between two end points
    x3 = x1 + L*ratio*math.cos(alpha+beta) # coordinates of the mid points between two segments
    y3 = y1 + L*ratio*math.sin(alpha+beta)
    shoreline(x1,y1,x3,y3,ratio) # do this recursively on each segment
    shoreline(x3,y3,x2,y2,ratio)

turtle.tracer(0,0)
turtle.bgcolor('royal blue')
turtle.pencolor('green')
shoreline(-300,0,300,0,0.53) # call recursion
turtle.update()
Animation of Recursive Steps
The curve above looks too perfect to be a shoreline of an island. Let’s add some randomness to the process. We can randomize the the ratio (0.55) to a range of ratios. We can also randomize the point of division from middle to somewhere left or somewhere right of it. To implement this, we need to use ellipse. Two end points of a line are the focal points of the ellipse, and the sum of distance from any point on the ellipse to the focal points should be a constant, which is 2*ratio*(length of line). The following is the code snippet for part we described above:
def draw_line(x1,y1,x2,y2): # function to draw line
    turtle.up()
    turtle.goto(x1,y1)
    turtle.down()
    turtle.goto(x2,y2)

def dist(p1,p2): # Euclidean distance betwen p1 and p2
    return ((p1[0]-p2[0])**2 + (p1[1]-p2[1])**2)**0.5

def shoreline(x1,y1,x2,y2,ratio): # recurisve function to draw the shoreline
    L = dist((x1,y1),(x2,y2))
    if L <= 1: # distance is short enough, directly draw the line
        draw_line(x1,y1,x2,y2)
        return
    rs = ratio + random.uniform(-0.1,0.1) # let ratio flucuate slightly around the chosen value
    rs = max(0.5,rs) # make sure ratio stays at least half of the length
    midx = (x1+x2)/2 # center of ellipse
    midy = (y1+y2)/2
    rx = L/2 + (2*rs-1)/2*L # width of ellipse
    ry = ((L*rs)**2 - (L/2)**2)**0.5 # height of ellipse
    theta = math.atan2(y2-y1,x2-x1) # the tilt angle of ellipse
    alpha = random.uniform(math.pi*0.3,math.pi*0.7) # flucuate around math.pi/2
    x3 = rx*math.cos(alpha)*math.cos(theta) - ry*math.sin(alpha)*math.sin(theta) + midx # parametric equation for ellipse
    y3 = rx*math.cos(alpha)*math.sin(theta) + ry*math.sin(alpha)*math.cos(theta) + midy
    shoreline(x1,y1,x3,y3,ratio) # do this recursively on each segment
    shoreline(x3,y3,x2,y2,ratio)

turtle.tracer(0,0)
turtle.bgcolor('royal blue')
turtle.pencolor('green')
shoreline(-300,0,300,0,0.55) # call recursion
turtle.update()
The code above should draw something looks random:
Random Line Segment
The rest is easy: Just draw a line backward and fill the whole thing. The following is the complete code for drawing a random island shape.
import turtle
import math
import random

turtle.setup(1000,1000)
turtle.title("Random Island Generator - PythonTurtle.Academy")
turtle.speed(0)
turtle.hideturtle()

def draw_line(x1,y1,x2,y2): # function to draw line
    turtle.up()
    turtle.goto(x1,y1)
    turtle.down()
    turtle.goto(x2,y2)

def dist(p1,p2): # Euclidean distance betwen p1 and p2
    return ((p1[0]-p2[0])**2 + (p1[1]-p2[1])**2)**0.5

def shoreline(x1,y1,x2,y2,ratio): # recurisve function to draw the shoreline
    L = dist((x1,y1),(x2,y2))
    if L <= 1: # distance is short enough, directly draw the line
        draw_line(x1,y1,x2,y2)
        return
    rs = ratio + random.uniform(-0.1,0.1) # let ratio flucuate slightly around the chosen value
    rs = max(0.5,rs) # make sure ratio stays at least half of the length
    midx = (x1+x2)/2 # center of ellipse
    midy = (y1+y2)/2
    rx = L/2 + (2*rs-1)/2*L # width of ellipse
    ry = ((L*rs)**2 - (L/2)**2)**0.5 # height of ellipse
    theta = math.atan2(y2-y1,x2-x1) # the tilt angle of ellipse
    alpha = random.uniform(math.pi*0.3,math.pi*0.7) # flucuate around math.pi/2
    x3 = rx*math.cos(alpha)*math.cos(theta) - ry*math.sin(alpha)*math.sin(theta) + midx # parametric equation for ellipse
    y3 = rx*math.cos(alpha)*math.sin(theta) + ry*math.sin(alpha)*math.cos(theta) + midy
    shoreline(x1,y1,x3,y3,ratio) # do this recursively on each segment
    shoreline(x3,y3,x2,y2,ratio)

turtle.tracer(0,0)
turtle.bgcolor('royal blue')
turtle.pencolor('green')
turtle.fillcolor('forest green')
turtle.begin_fill()
shoreline(-300,0,300,0,0.55) # call recursion
shoreline(300,0,-300,0,0.55) # call recursion
turtle.end_fill()
turtle.update()
You can adjust the ratio value to draw different looking islands. The higher the ratio the crazier the shape of the island shape will look.
Let’s take a look at the the following unfilled cloud picture. As you can see, we drew the cloud just by drawing many arcs of different sizes and extent.
Unfilled Cloud
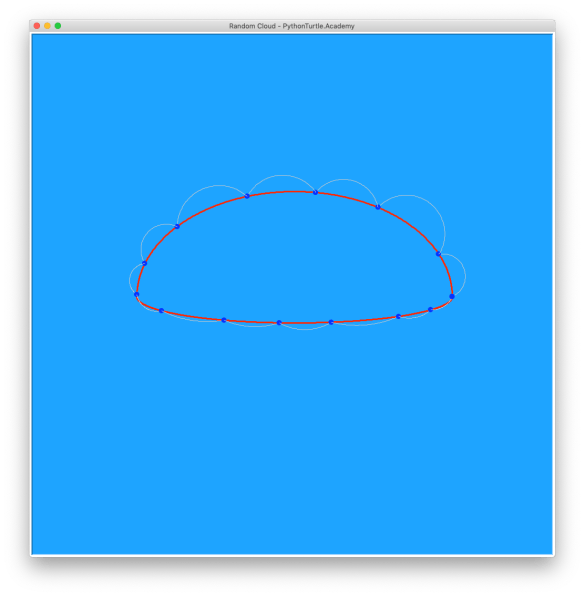
The problem is how we can draw this arcs to form the shape of a cloud (You can try randomly draw these arcs to see what shape it forms). The solution is to use an oval shape to control the end points of these arcs. As you can see in the following picture, the arcs starts and ends on the points of an oval shape.
Arcs Starts and Ends on the Oval Shape
Here is the general idea of the algorithm for drawing the cloud shape: 1. Create an oval shape and put the coordinates of points on the oval into a list. 2. Starting from a point in the list, randomly skip certain number of points and stop on another point. 3. Use two points from step 2, decide the extent of arc randomly and draw the arc. 4. Repeat 2,3 until all the points on the oval is covered.
Now let’s get into the details:
Creating the Oval
We can use two halves of ellipses to draw the oval shape. Because clouds have flatter bottom than the top, we should make top ellipse is taller than the bottom one. Both of them should have the same width. The easiest way to create this shape is to use parametric equations for ellipse. The following is the code snippet:
n = 500 # number of points on each ellipse
# X,Y is the center of ellipse, a is radius on x-axis, b is radius on y-axis
# ts is the starting angle of the ellipse, te is the ending angle of the ellipse
# P is the list of coordinates of the points on the ellipse
def ellipse(X,Y,a,b,ts,te,P):
    t = ts
    turtle.up()
    for i in range(n):
        x = a*math.cos(t)
        y = b*math.sin(t)
        P.append((x+X,y+Y))
        turtle.goto(x+X,y+Y)
        turtle.down()
        t += (te-ts)/(n-1)
P = [] # starting from empty list
ellipse(0,0,300,200,0,math.pi,P) # taller top half
ellipse(0,0,300,50,math.pi,math.pi*2,P) # shorter bottom half
Drawing an Random Arc
The next problem we need to solve is: how can we draw an arc given two points and extent? We need to figure out the radius and the initial heading for drawing the circle. This requires some geometry work details of which will be skipped for this tutorial. The following code snippet for this part:
# computes Euclidean distance between p1 and p2
def dist(p1,p2):
    return ((p1[0]-p2[0])**2 + (p1[1]-p2[1])**2)**0.5

# draws an arc from p1 to p2 with extent value ext
def draw_arc(p1,p2,ext):
    turtle.up()
    turtle.goto(p1)
    turtle.seth(turtle.towards(p2))
    a = turtle.heading()
    b = 360-ext
    c = (180-b)/2
    d = a-c
    e = d-90
    r = dist(p1,p2)/2/math.sin(math.radians(b/2)) # r is the radius of the arc
    turtle.seth(e) # e is initial heading of the circle
    turtle.down()
    turtle.circle(r,ext,100)
    return (turtle.xcor(),turtle.ycor()) # returns the landing position of the circle
                                         # this position should be extremely close to p2 but may not be exactly the same
                                         # return this for continuous drawing to the next point

draw_arc((0,0), (-100,200), 150)
Drawing the Cloud
With previous two sections done, we are ready to draw the cloud. We randomly skip a number of points to get to the next point, randomly generate an extent, and draw the arc between these two points. This is to be repeated until all points are covered. There are a few details to address. The top part of cloud is more ragged than the bottom part. Therefore, we should give wider range for the extent and steps for random number generator. The following is the complete code for drawing clouds:
import turtle
import math
import random

screen = turtle.Screen()
screen.setup(1000,1000)
screen.title("Random Cloud - PythonTurtle.Academy")

turtle.speed(0)
turtle.hideturtle()
turtle.up()
turtle.bgcolor('dodger blue')
turtle.pencolor('white')
turtle.pensize(2)

n = 500 # number of points on each ellipse
# X,Y is the center of ellipse, a is radius on x-axis, b is radius on y-axis
# ts is the starting angle of the ellipse, te is the ending angle of the ellipse
# P is the list of coordinates of the points on the ellipse
def ellipse(X,Y,a,b,ts,te,P):
    t = ts
    for i in range(n):
        x = a*math.cos(t)
        y = b*math.sin(t)
        P.append((x+X,y+Y))
        t += (te-ts)/(n-1)

# computes Euclidean distance between p1 and p2
def dist(p1,p2):
    return ((p1[0]-p2[0])**2 + (p1[1]-p2[1])**2)**0.5

# draws an arc from p1 to p2 with extent value ext
def draw_arc(p1,p2,ext):
    turtle.up()
    turtle.goto(p1)
    turtle.seth(turtle.towards(p2))
    a = turtle.heading()
    b = 360-ext
    c = (180-b)/2
    d = a-c
    e = d-90
    r = dist(p1,p2)/2/math.sin(math.radians(b/2)) # r is the radius of the arc
    turtle.seth(e) # e is initial heading of the circle
    turtle.down()
    turtle.circle(r,ext,100)
    return (turtle.xcor(),turtle.ycor()) # returns the landing position of the circle
                                         # this position should be extremely close to p2 but may not be exactly the same
                                         # return this for continuous drawing to the next point


def cloud(P):
    step = n//10 # draw about 10 arcs on top and bottom part of cloud
    a = 0 # a is index of first point
    b = a + random.randint(step//2,step*2) # b is index of second point
    p1 = P[a] # p1 is the position of the first point
    p2 = P[b] # p2 is the position of the second point
    turtle.fillcolor('white')
    turtle.begin_fill()
    p3 = draw_arc(p1,p2,random.uniform(70,180)) # draws the arc with random extention
    while b < len(P)-1:
        p1 = p3 # start from the end of the last arc
        if b < len(P)/2: # first half is top, more ragged
            ext = random.uniform(70,180)
            b += random.randint(step//2,step*2)
        else: # second half is bottom, more smooth
            ext = random.uniform(30,70)
            b += random.randint(step,step*2)
        b = min(b,len(P)-1) # make sure to not skip past the last point
        p2 = P[b] # second point
        p3 = draw_arc(p1,p2,ext) # draws an arc and return the end position
    turtle.end_fill()

P = [] # starting from empty list
ellipse(0,0,300,200,0,math.pi,P) # taller top half
ellipse(0,0,300,50,math.pi,math.pi*2,P) # shorter bottom half
cloud(P)